Name your price for four excellent indie games -- six, if you pay above the average, which is currently mere USD 4.59! The above-average-price games are Fez and FTL: Faster Than Light which have both received highly favorable reviews. Within the four games that you can get for any price there's for example such a gem as Mark of the Ninja. All the games work for Windows, Linux and Mac. You'll get Steam keys and you also get to download them, free of any DRM technologies that would hinder the gaming experience.
lauantai 14. syyskuuta 2013
maanantai 1. huhtikuuta 2013
iPad games
Aside from all the Rovio's Angry Birds and Bad Piggies games, there are many other great games for iPad. I present three of them here, in no particular order.
 Need for Speed: Most Wanted is a beautiful and well implemented racing game. There are several different tracks with different types of races. More tracks are unlocked when you do well, and more cars become available for purchase with the money you earn from winning the races. There are many types of cars and not all races are open to, say, sports cars, but you need to drive, for example, a Hummer every once in a while as well. Aside from their looks the cars have a few different attributes that make them different: speed, acceleration and handling, and there's also implicitly the weight. These attributes can be modified per race by adding various modifications to the car. These mods include engine tweaks, lightweight chassis and reinflating tyres (Yes, reinflating tyres are needed -- the races in the game are "illegal", so there are police cars that may try to stop you using spike strips). You control the car by steering your entire iPad (or iPhone), which is quite a nice and intuitive way of driving. You can also touch the right side of the screen to drift. NFS:MW does not support the Apple Game Center but it has its own in-game social system called Origin, for which you might actually already have an account if you have played any other Electronic Arts games recently, even on PC.

 Fieldrunners 2 is a tower defense game where almost endless hordes of enemies try to cross the playing area on which you must build a maze for them using various lethal obstacles, including machine gun towers, flamethrower towers and radiation towers. The game is pretty and humoristic, has many levels of a few different types, and it has quite a few different types of towers as well. At the beginning only some quite basic towers are available, but more can be purchased with the in-game gold. Compared to Plants and Zombies I prefer Fieldrunners 2 by far. Some maps of Fieldrunners 2 even contain director's commentary on how the map came to be. There are also many different enemies with different traits: some are very fast, some fly over your defense towers, some are immune to radiation. The Heroic difficulty level also basically requires you to use items that you can drop on the field for some brief additional effect, such as freezing, poisoning or exploding the enemies. Fieldrunners 2 integrates nicely with the Apple Game Center, allowing you to compare you scores with those of your friends.
SpaceChem is an excellent puzzle game unlike any other I have ever played. In the game your task is to build reactors to transform molecules and atoms to other molecules. You do this by creating "tracks" for molecule transporters (called "waldos") and by adding instructions to those tracks: input atom, grab an atom, drop the atom, rotate the molecule, etc. While this all might sound or look incomprehensible at first, the game actually has a good tutorial that slowly introduces you to all the concepts little by little. On some levels (so called research assignments) you must only build one reactor, whereas in others (production assignments) you actually design several reactors and how they connect to each other. The game is also available for Windows, Linux and Android, which may be one reason why it unfortunately does not integrate with the Apple Game Center. However, this game as well has a social component: on each level you can see statistics about all other plays of the level by everyone else. The statistics include the number of reactors used, number of cycles used and number of instructions used, so you can try to optimize your solution according to different attributes, if you want to. There are also in-game achievements to earn by, say, completing a certain level in a certain amount of cycles (in-game "ticks of time"). SpaceChem has a few dozen levels built in and more can be downloaded from the Research Net, so it should provide hours of fun.
That's it for this time, but finally, a tip: you can use the AppShopper.com site to watch for price drops and new apps. It also shows the price history of all the apps in the App Store, and you can browse apps by popularity and category.
Need for Speed: Most Wanted

Fieldrunners 2

 Fieldrunners 2 is a tower defense game where almost endless hordes of enemies try to cross the playing area on which you must build a maze for them using various lethal obstacles, including machine gun towers, flamethrower towers and radiation towers. The game is pretty and humoristic, has many levels of a few different types, and it has quite a few different types of towers as well. At the beginning only some quite basic towers are available, but more can be purchased with the in-game gold. Compared to Plants and Zombies I prefer Fieldrunners 2 by far. Some maps of Fieldrunners 2 even contain director's commentary on how the map came to be. There are also many different enemies with different traits: some are very fast, some fly over your defense towers, some are immune to radiation. The Heroic difficulty level also basically requires you to use items that you can drop on the field for some brief additional effect, such as freezing, poisoning or exploding the enemies. Fieldrunners 2 integrates nicely with the Apple Game Center, allowing you to compare you scores with those of your friends.
SpaceChem
 |
| Reactor splitting Nitrogen and Oxygen molecules |
 |
| A production assignment in action |
That's it for this time, but finally, a tip: you can use the AppShopper.com site to watch for price drops and new apps. It also shows the price history of all the apps in the App Store, and you can browse apps by popularity and category.
torstai 28. helmikuuta 2013
iPad Mini for dummies
 |
| The Home Screen |
Enabling the Safari bookmarks bar
First, I tried the Safari browser. It's quite minimalistic, and by default you don't even see a bookmark bar. The weird thing compared to, say, Android or Windows is that you cannot control the settings of Safari from the app itself! This seems to be true with many other apps as well. Instead, you need to go to the Home Screen with all the icons and navigate to the Settings app. In there, select Safari and then toggle on the Always Show Bookmarks Bar setting.
 |
| Adding a bookmark |
Muting the keyboard sounds and using the Side Switch
The physical volume buttons of the device don't affect the keyboard sounds. By default you can mute those too with the little switch above the volume controls, but since muting the other sounds of the device is just a matter of briefly holding the 'volume down' button, it seems like a waste to use the switch only to mute the keyboard sounds.
 |
| Settings |
Multitasking Gestures
Multitasking Gestures are a way of quickly switching between apps. They are enabled from the same General panel where the Side Switch function is changed. The gestures are done with four or five fingers:
you can pinch to show the Home Screen, swipe left or right to switch between apps, or swipe up to reveal the multitasking bar.
 |
| Volume controls in the multitasking bar |
Disabling Auto-Correction
In theory, Auto-Correction fixes your spelling mistakes. In practice, however, it usually just makes you write things horribly wrong. To disable Auto-Correction, go to Settings -> General -> Keyboard and just toggle Auto-Correction off.
sunnuntai 17. helmikuuta 2013
VirtualBox
If you have ever wanted to try another operating system besides your current main one, then VirtualBox is your solution. VirtualBox creates a virtual computer inside your Windows (or Linux, for that matter) and you can then install any operating system into it and launch the virtual computer just like you would launch any regular application. With VirtualBox you don't need to reboot your computer every time you wish to switch to another operating system. I remember originally hesitating about the whole concept at first, thinking that it must be somehow difficult to use, but I was wrong: it couldn't be much easier.
Let's start. Download VirtualBox from the site linked to above. Then download an image of some Linux distribution, say, Linux Mint. An "image" in this context is a large file, usually with a .iso extension, that you would normally burn to a DVD and insert into your computer when booting it, causing it to load the installer from the DVD. However, with VirtualBox you can use a virtual DVD drive, so it just uses the file you downloaded, without needing any actual physical installation disk to be inserted.
Install VirtualBox. It's a normal application so there's nothing weird about the installation process. Then, once your Linux image download finishes, run Virtual box. You are greeted with a screen more or less like this:

 Here, enter some descriptive name for your computer (like I've just entered "Linux Mint" here) and select the OS type that best matches what you are installing. For Mint, the above settings work well.

The next phase is to give the virtual computer a virtual disk to which the operating system can be installed and files can be saved. This disk, just like the virtual computer, is actually only a file on one of your normal hard drives.

 Then select where to place the virtual disk file on your computer. I have created a dedicated V:\VirtualBox folder for it and selected it to be 25 gigabytes:
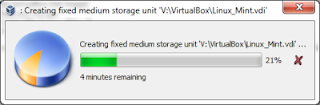
 Now the disk file is created. This phase might take a few minutes:


Let's start. Download VirtualBox from the site linked to above. Then download an image of some Linux distribution, say, Linux Mint. An "image" in this context is a large file, usually with a .iso extension, that you would normally burn to a DVD and insert into your computer when booting it, causing it to load the installer from the DVD. However, with VirtualBox you can use a virtual DVD drive, so it just uses the file you downloaded, without needing any actual physical installation disk to be inserted.
Install VirtualBox. It's a normal application so there's nothing weird about the installation process. Then, once your Linux image download finishes, run Virtual box. You are greeted with a screen more or less like this:

Here in this VirtualBox I have already installed an Ubuntu system, so your view of the application will be much emptier, but don't let that bother you. Instead, click on the 'New' button in the toolbar to get to this view:

Now the next phase should be to decide the amount of memory you wish to dedicate to your virtual computer:

Computers generally run smoother the more memory they have, but be sure to leave some for your main operating system as well. :) Here, VirtualBox suggests a ridiculously low amount of 384 MB of memory. That may have been enough about ten years ago, but definitely not today, so I've given it a third of all the memory in my computer, i.e. 4 GB, leaving the other 8 GB for Windows and its other applications.
The next phase is to give the virtual computer a virtual disk to which the operating system can be installed and files can be saved. This disk, just like the virtual computer, is actually only a file on one of your normal hard drives.
The process goes like this: first you choose a file format for your disk. You don't really need to care about this, because as it says, you can leave it unchanged because you are not going to use it with any other virtualization software besides VirtualBox:

Next you choose whether you want a dynamically allocated disk or a fixed size disk. The dynamically allocated disk starts with a smaller file and grows when more data is saved on it, whereas the fixed size disk is at its maximum size right from the beginning and, like the prompt says, is often faster to use:


Congratulations! Your virtual computer is now ready to be booted up for the first time. Click on the Start button in the toolbar when your new computer is selected. Again, don't mind me having the Ubuntu computer there -- you should now only have that Linux Mint computer, or whichever OS you chose to install:

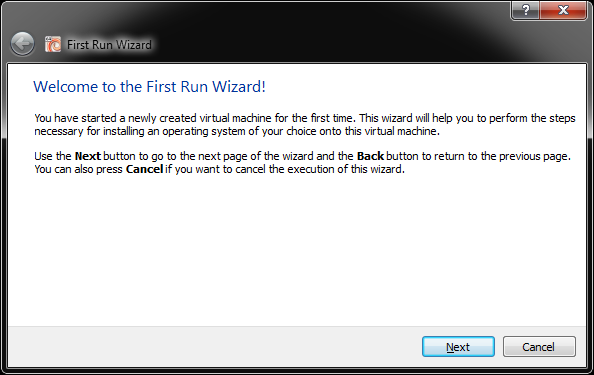
You should now see a First Run Wizard that prompts you for the image file you downloaded earlier. Find it and let the installation begin:

The virtual computer boots up and probably loads the Linux Mint desktop. It's now running off the virtual DVD, so it's not installed into the virtual hard drive yet. Open the Install Linux Mint application:

Mint is easy to install. Just fill in the forms:

After the installation is finished, you should be back at the desktop, this time without the "Install Linux Mint" application. Well done!
Finally, if when trying to change the screen resolution in the operating system in your new virtual computer the higher resolutions are not available, try following these instructions posted elsewhere.
sunnuntai 6. tammikuuta 2013
Pocket (formerly Read It Later)

Pocket (formerly Read It Later) is a web site / application that is designed to solve the problem of stashing interesting articles to be read later. Stashing an article from your browser couldn't be simpler: it's just a click of a single button (for Opera, Firefox, Chrome). There are also versions of Pocket for Android and iOS that allow you to update and, equally importantly, to read the articles you have stashed before. Pocket formats the stored articles nicely, stripping out all non-essential content such as advertisements and navigation links, showing you just the main text.
Right now my Pocket seems to contain about two dozen articles, including these:
- Avoid Being Embarrassed by Your Error Messages
- Wasteland: the 50-year battle to entomb our toxic nuclear remains
- Using twitter to build password cracking wordlist
- Epic Stop-Motion Fan Made Animation: Batman – Dark Knightfall [Video]
- RESTful API Server – Doing it the right way (Part 1)
Tilaa:
Blogitekstit (Atom)